
From Scrap To Scalding-How To Make A Bush Hot Water System!
If you’re living off the grid, relying on solar, a generator, and catching rainwater or pumping it from a stream, it doesn’t have to mean going without hot showers or warm water for other uses. I wanted that bit of comfort for myself, so I built a DIY wood fired water heater using scrap. I grabbed a discarded 50-litre electric hot water tank and other scraps that someone had left at the local dump. Now I’ve got scalding hot water powered by nothing but free bush firewood.
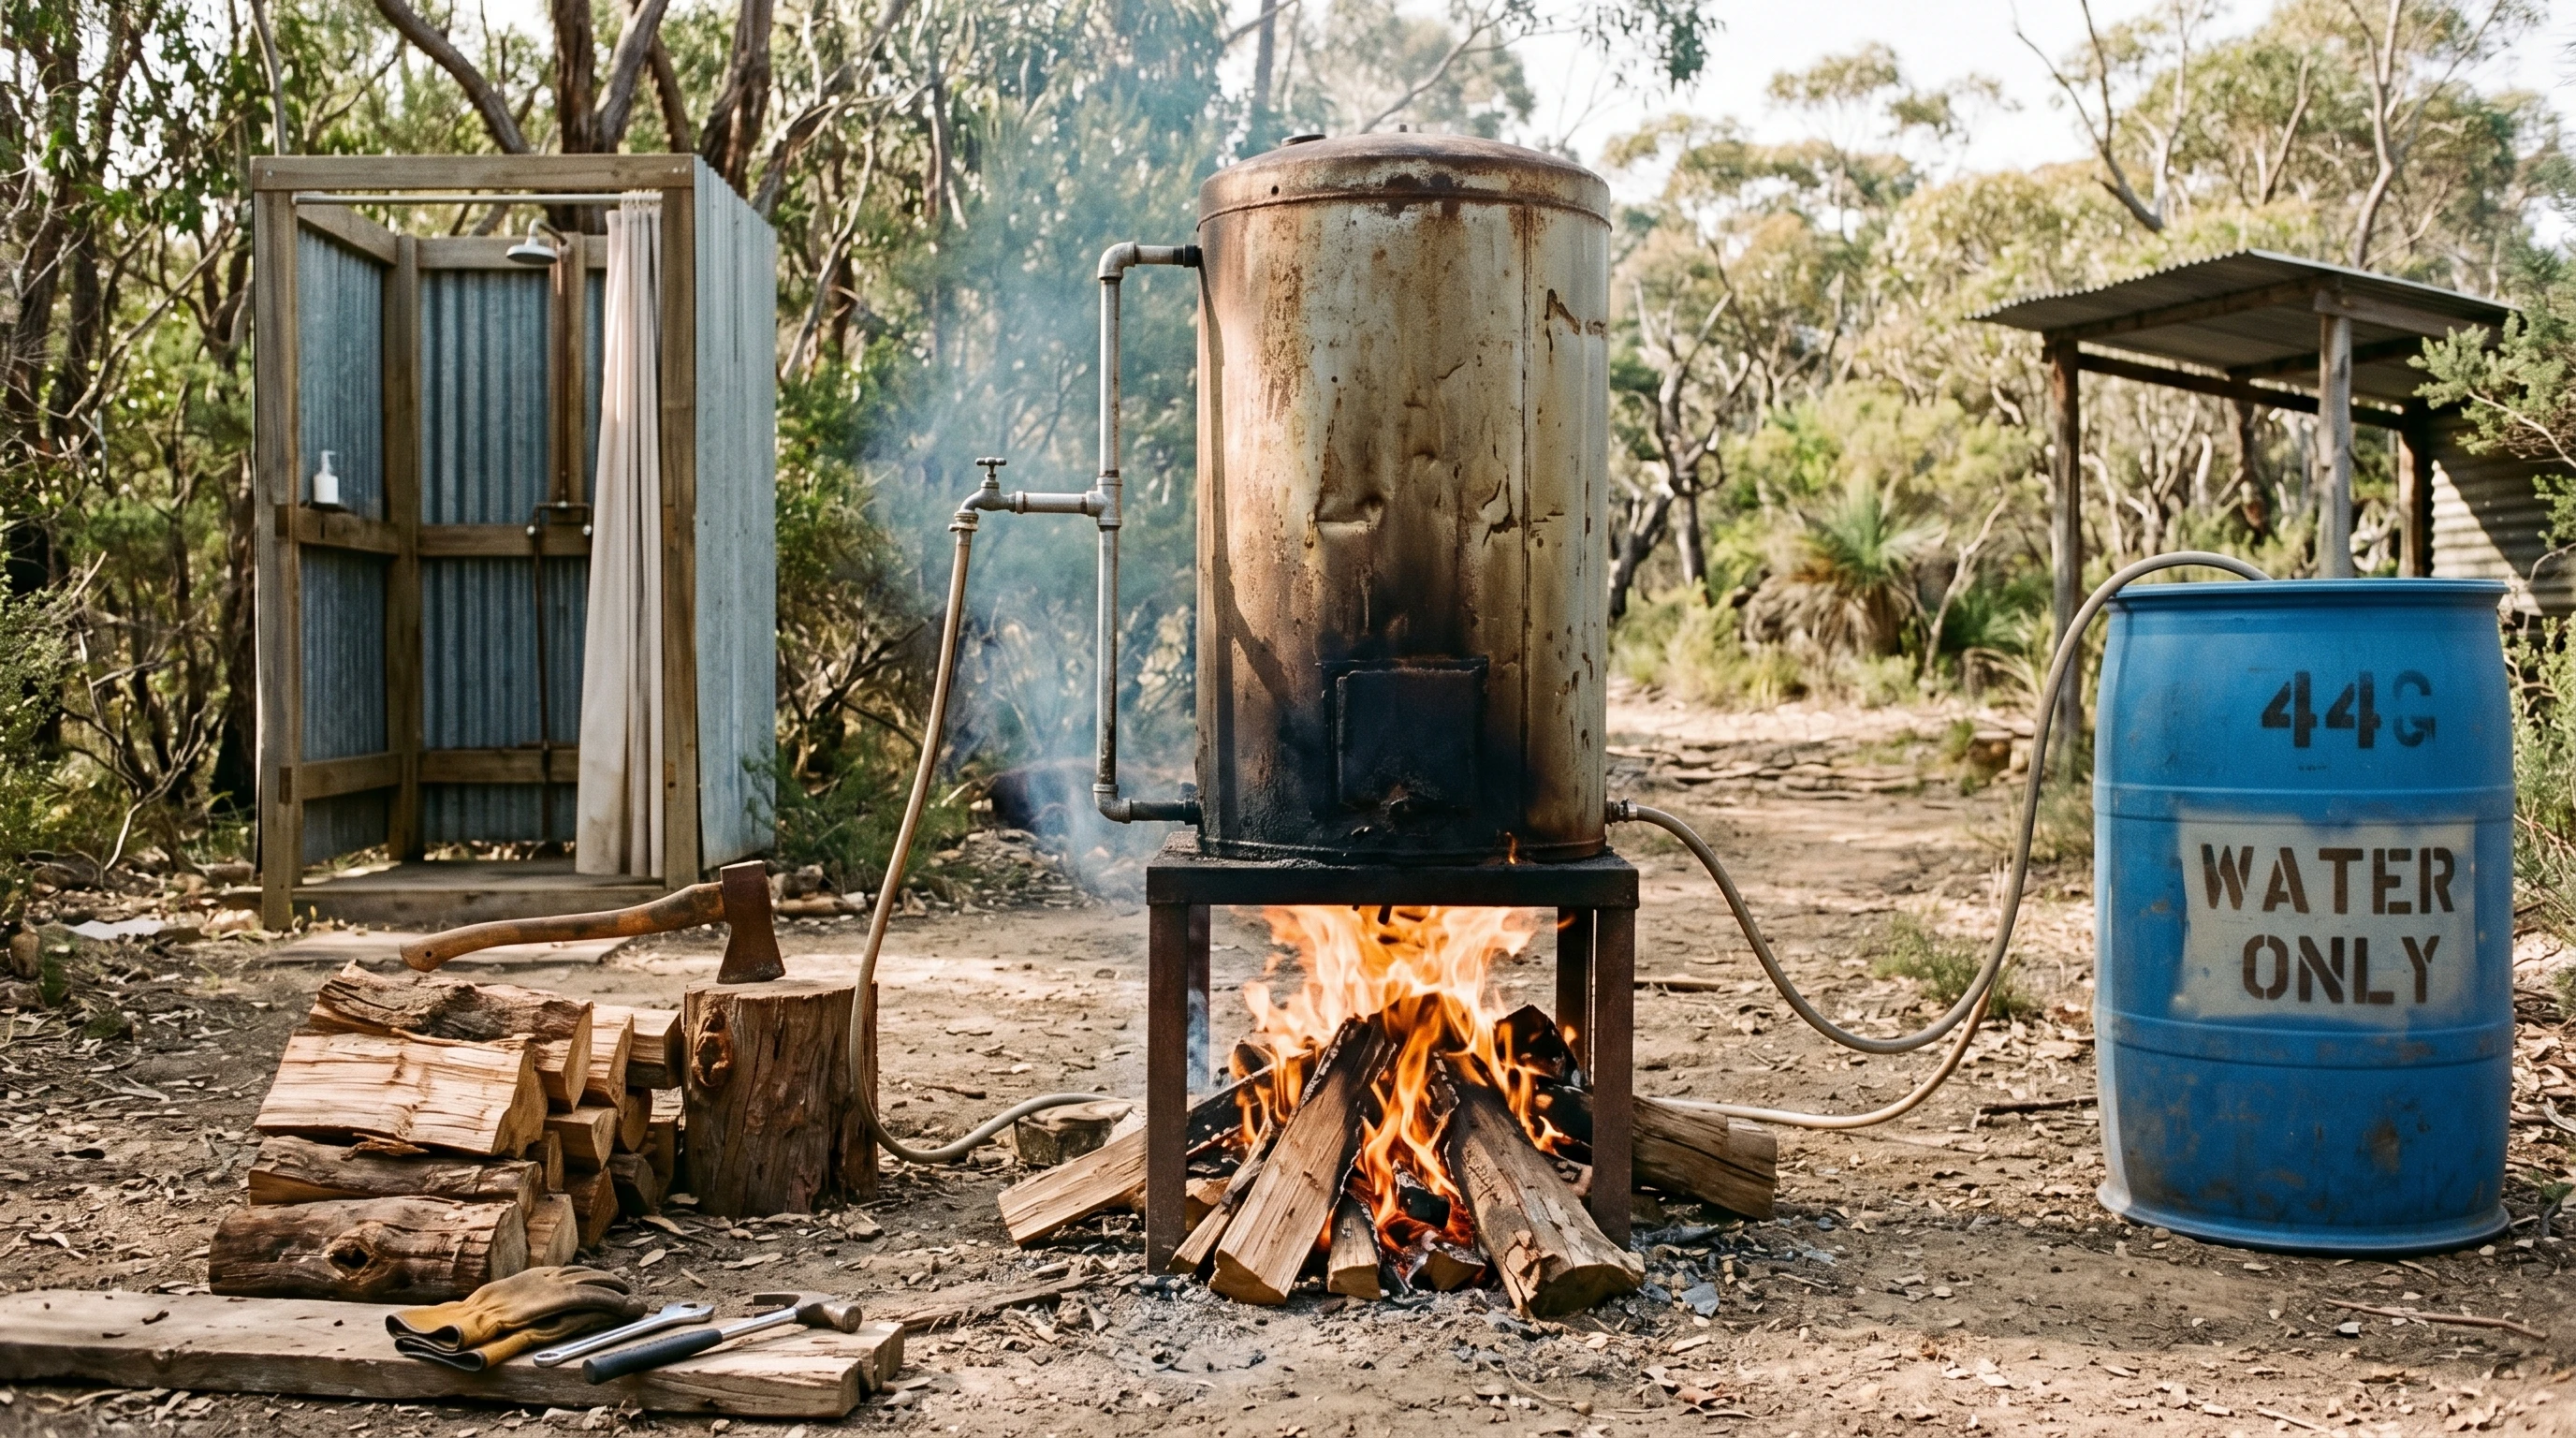
Why Build Your Own Bush Hot Water System?
There’s a real sense of satisfaction in making something work with what most people consider rubbish. One major plus here is recycling an old electric hot water tank rather than letting it rust away at the tip. This kind of setup doesn’t need gas, electricity, or any grid connection. All you need is firewood and a little time. With a bit of know-how, you end up with a reliable supply of hot water for showers, dishes, or just washing muddy hands after a day outside. A lot of rural/off-grid folk choose this route because it’s sustainable, cost-effective, and encourages smart use of available resources. Plus, making use of scrap materials sends less to landfill and can save you money to.
Main Ways to Heat Water Off-Grid
Using a wood-fired water heater generally leads to two main methods/systems:
- Thermosiphon systems: These use natural convection currents to move hot water from a firebox coil up into a holding tank. The trick here is harnessing the way hot water rises and cold water sinks, so you naturally get circulation without a pump. It’s a bit more complicated to set up, but can be efficient once running, especially if you’re looking for a semi-permanent solution for a cabin or off-grid tiny house
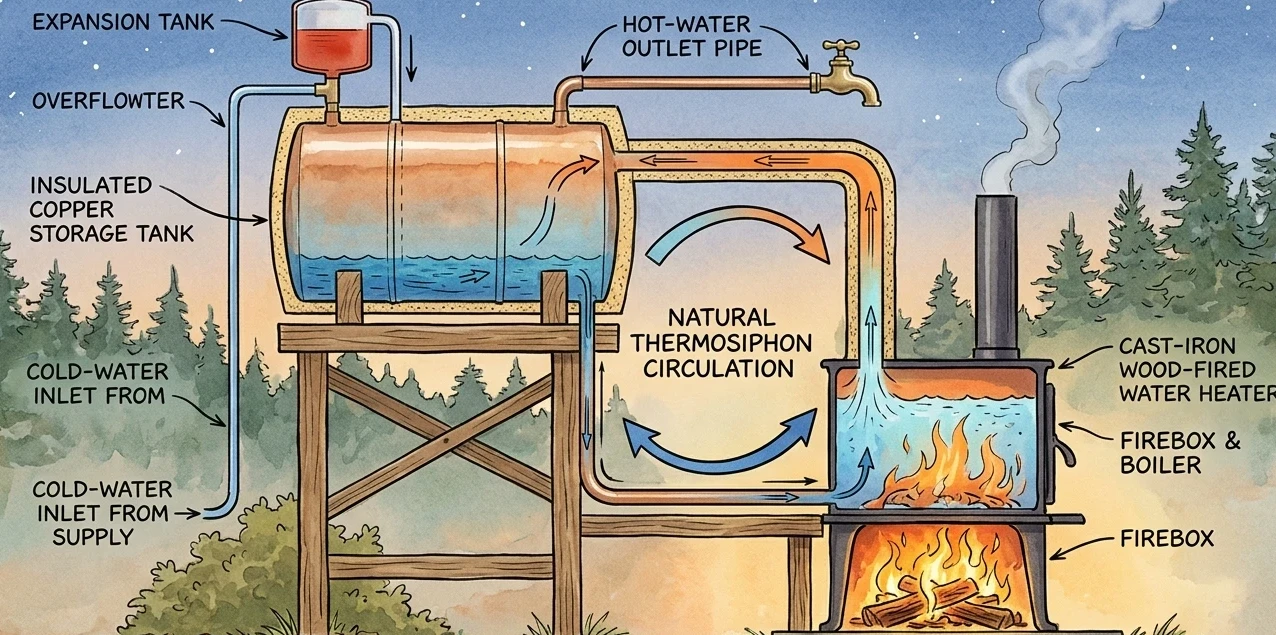
- Direct-fired tanks: With this option, you set the old tank directly over a fire, heating the entire mass of water inside. This is the approach I used for this project. It’s basic, low-tech, and has very few parts to break or maintain, making it ideal for bush life.
This project explains the direct-fired approach. It’s straightforward to set up, needs minimal plumbing, and even if you’ve never messed with hot water systems before, you should feel comfortable tackling it after reading this.
What You’ll Need (and Where to Find It)
Tracking down the bits and pieces for the build is almost half the fun. Here’s my basic hardware list:
- Old 50L electric hot water tank. Check your local tip, browse online classifieds, or ask a plumber if they’re swapping out any old units.
- Car rim (steel, standard size). Use it for the fire base. Tyre shops, dumps, and sometimes the side of the road are good sources.
- Sheet of corrugated iron (about 500mm to 600mm square). Make sure there are no holes in it, as this will serve as the base for your fire under the tank.
- One 15mm compression nut and olive. Pick these up at a hardware or plumbing supply shop.
- 1m or any preferred length of ½-inch copper plumbing pipe. Salvaged or store-bought both work.
- PTFE tape. For thread sealing.
- 2 x 1200 mm Star pickets or sturdy steel bar. These will support everything above the ground.
Before you haul any tank home, carefully check for holes, rust, or dodgy-looking seams. You want something that will comfortably hold water and not start leaking after the first time you heat it. If in doubt, fill it with water overnight to spot any slow leaks before you go to the trouble of cleaning it up and fitting it out.
Stripping and Prepping the Old Hot Water Tank
- Slice the Outer Shell: Put on gloves and safety glasses before starting. Use an angle grinder to make a vertical cut down the side. Tin snips will do if you’re patient (and don’t mind a workout).
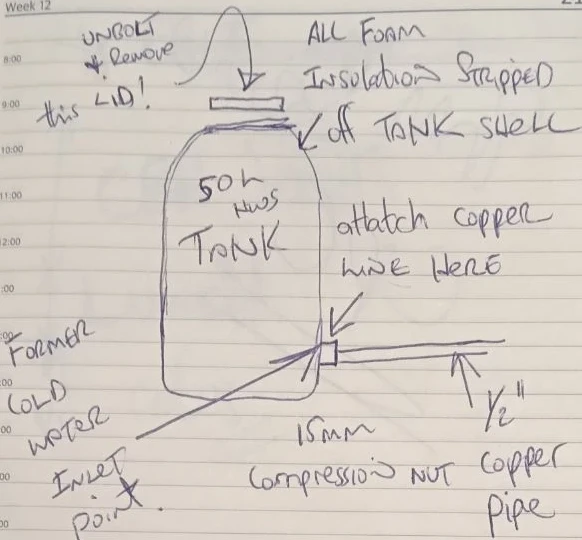
- Remove All Foam Insulation: Electric hot water systems are wrapped in a thick foam layer around the inner cylinder. Scrape it all off with a saw, putty knife, or stiff brush. Be thorough; any foam left in the hot zone will release yucky fumes when heated.
- Pop Off the Lid: There’s usually a bolted lid at the top. Undo it and set the bolts aside. Leave the electric element in place to keep the tank sealed, but snip off any wires protruding from the side.
- Clean the Inside: Use a hose to flush out any old scale or sludge. I gave mine a thorough blast to avoid boiling up a gritty mess the next time I filled it up.
- Replace the Lid (Loosely): Place the lid back on top so it covers the opening, but don’t tighten it down. Think of it like a fill cap; easy to remove for pouring water in when needed.
How to Build a Fire Ready Base
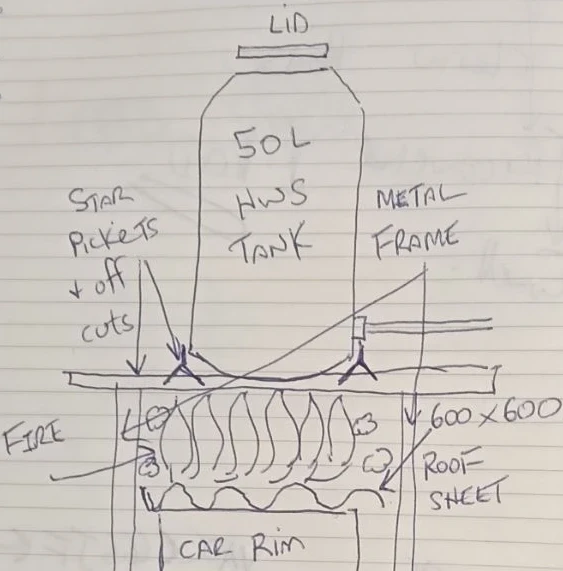
The tank needs a solid, fireproof support to sit on. I went with two star pickets set across a basic steel frame to support the weight. Don’t ever use bricks or besser blocks to lay the pickets on as a base, as bricks always eventually crumble and crack after being subjected to repetitive heating by fire. Sitting directly below this frame, I laid a car rim on its side with the corrugated sheet sitting on top of the rim, giving a stable, heat-resistant surface for the fire to burn right beneath the tank. Try to keep the fire roughly 300 to 400 millimeters from the bottom of the tank for good heat transfer, and block off unwanted wind so it doesn’t interrupt or disperse your flame heat under the tank.
Mounting the Tank and Running the Plumbing
- Stabilize the Tank: Most tanks have a rounded base, making them prone to wobble. Place offcuts of star pickets at right angles to the 2 main star pickets around the base of the tank and tie them together with fencing wire so the setup stays steady and the tank remains upright.
- Hot Water Outlet: Wrap PTFE tape around the former cold water inlet thread at the bottom of the tank. Connect your copper pipe using the 15mm compression/olive fitting. Attach a tap or on/off valve at the end of this pipe to draw hot water as needed. The former cold water inlet has now become the hot water outlet!
- Cold Water Fill: To fill, pour water in from the top once the loose lid is off. Replace the lid to keep heat from escaping. If you want to get more technical and keep from removing the lid every time, you could pipe in a fill line with a funnel from above, but I usually just pour straight in using another water container or hose.
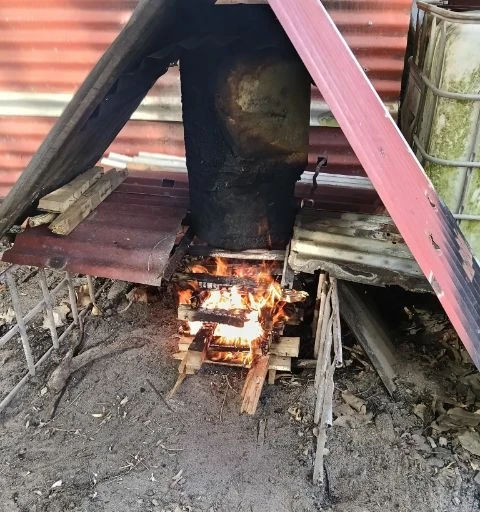
Getting Hot Water: Firing It Up
Fill up the tank, put the lid loosely back on, stack some split wood in the fire base, and light it. For a full 50L tank, let the fire go for 40 to 60 minutes, checking the outlet pipe occasionally. Once it’s running hot, you’ve got enough water for several showers or a bit of big washing up after dinner. A simple rule of thumb here, the more water in the tank to be heated = more fire for longer.Less water to heat =smaller fire in less time. Working this out will only come by personal experience. To put it another way, once you have a cold shower, you will definitely remember to heat that water longer next time!
Tips for Safe and Simple Operation
- Don’t seal the tank tightly. Steam needs to vent safely, so always keep that lid loose or install a small vent hole if you’re building a more permanent rig. Over-pressurizing can be dangerous.
- Remember, the water temperature is not automatically regulated. Always check the hot water and mix with sufficient cold water for a safe and preferred temperature mix.
Common Problems and Solutions
- Leaking fittings: If the joins leak, wrap the threads again with PTFE tape and tighten, but don’t overtighten or you risk splitting older threads.
- Slow heating: Feed in more wood or split your fuel smaller so it catches faster and burns hotter. Also, check that there’s enough airflow under the fire to keep things burning efficiently.
- Odd smells from foam or residue: Go back and double-check you scraped off all insulating foam below and around the tank’s base and overall shell. Burning foam can be quite toxic if inhaled.
- Water not flowing: Clear any blockages in your outlet or check if debris inside the tank is clogging the pipe. Sometimes old scale or mineral chunks break loose during the initial cleanout and get stuck in your copper pipe.
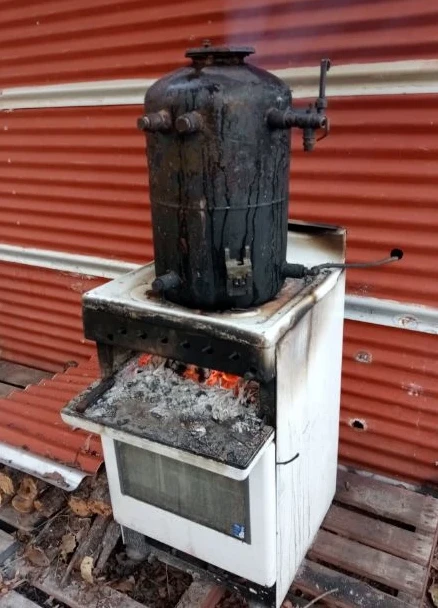
Frequently Asked Bush Hot Water System Questions
How long does it take to heat up?
For a full 50L tank, it’s usually about 45 minutes with a strong fire. If the tank is half full, it heats up much faster. If you’re pressed for time, fill it partly for a quick turnaround.
Can I use other tanks?
Definitely. Nearly any old hot water system or similar tank e.g., a 44-gallon drum, will work, as long as it’s in decent shape and you thoroughly remove any toxic or flammable material from all areas that will get hot.
What about smoke or flames damaging the tank?
Repetitive heating to the underside of the tank will eventually cause it to flake, become thin, and leak. This can be avoided by welding a second plate to the bottom of the tank to thicken it up a bit more.
Final Thoughts
Building a bush hot water system from a scrap electric tank is one of the best practical off-grid projects I’ve ever tackled. You end up with steady hot water whenever you want, powered solely by scavenged timber and some creative thinking. If you take safety seriously and thoroughly strip off all those flammable materials, there’s not much that’s likely to go wrong. Other than that, there is nothing like the smell of bush timber burning as the sun goes down while having a cup of tea and knowing that there is a hot shower waiting for you at the end of a hot, dusty, and dirty day. Please add any comments or thoughts you may have r.e this article below, I would love to hear them!


You have thought of everything here and this is a great idea, especially if you live out in the bush and you need to have the option of having a hot shower. I also think it is a great bit of advice to weld a second plate to the bottom to ensure that the tank lasts a lot longer. I also love that this is a budget way to build something of tremendous use.
Thanks MIchel for your comment here.Yes,remote living does have its challenges,but also its joys in working out ways around everyday problems.
I had a similar experience a few years ago while staying at a remote campsite where there wasn’t any proper hot water setup. We ended up using a basic drum-and-fire method to heat water for showers, and honestly it worked much better than I expected. It wasn’t fancy at all, but after a long day outdoors, having warm water felt like a luxury.
The biggest challenge was keeping the temperature consistent without overheating it. Everyone became very careful about testing the water first because it could get extremely hot faster than expected. Did you find there’s a reliable way to control the water temperature consistently without risking it getting dangerously hot?
Hi Monica,thanks for checking out this article and your comment here!The only way to regulate water temperature is to mix with cold water to your liking and then use.This will only come down to regular use and personal experience on getting a preferred water temperature.
This is such a practical and inspiring project! Living in a rural area myself, I’m always looking for less expensive ways to give my family the comfort of hot showers and baths without relying too much on costly systems. I really appreciate how you showed that scrap materials can be repurposed into something so useful; it makes the idea feel achievable even for someone without advanced technical skills.
From your experience, do you find the direct-fired tank setup more reliable long-term, or would a thermosiphon system be worth trying if we wanted something a bit more permanent for family use?
Hi Alice, thanks for your comment here.If you are talking about a family situation,I would start by getting a bigger tank for a start, above 50 ltrs.I think thermosiphon would definitely be the way to go for a family with proper plumbing as described in the first image on my article.